
Price tags are a common graphic art that is used for many different marketing prints such as in brochure printing, and booklet printing. Now with the easy tools that you can get from illustrator, you yourself can create your own great looking vector price tag graphics easily. Let me teach the basics in creating a good looking vector price tag for your printed graphic. Let us first start with creating the main rectangle.
1. Start by selecting the rectangle tool in the tools window.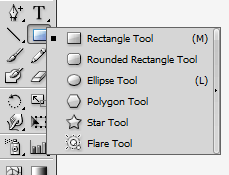
2. Next, click and drag over the canvass to start drawing your rectangle.
3. Adjust the color of your rectangle when necessary by selecting its color options.
4. Next, add a new anchor point to our rectangle. Just go to your tool window and select the “Add Anchor Point Tool”.
5. Since many price tags have pointed edges an one side, we will prepare this by adding one anchor point at the end of the rectangle, in the middle of the two sides.
6. Once the anchor is placed, select the “Direct selection” tool in the tools window.
7. Grab the new anchor point we made and drag it outwards. You should see our basic price tag shape form.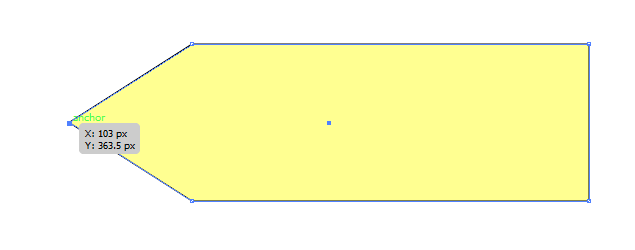
8. Next, let us simulate some borders around the price tag. Use the selection tool (shortcut V) and simply press CTRL+C and then CTRL+V to duplicate our base layer.
9. Change its color to a lighter color and resize it a bit smaller than the original.
10. Place it back on top of our main image to get the border effect.
11. Enhance the border effect by adding a dotted stroke. Just select our smaller shape, and then change its stroke properties to 1px dotted. Make sure you choose a color that is fully contrasting to the background.
12. You should get a result like this:
13. Now, select the larger rectangle again. Adjust its fill and turn it into a gradient. You can do this through the gradient panel. Just make sure you choose the right color that blends well.
14. Next, we shall add the price tag hole. Just use the ellipse tool to create a whole. Color it with the color of your background of course.
15. Then, we shall add some dotted strokes to further enhance this circle as well.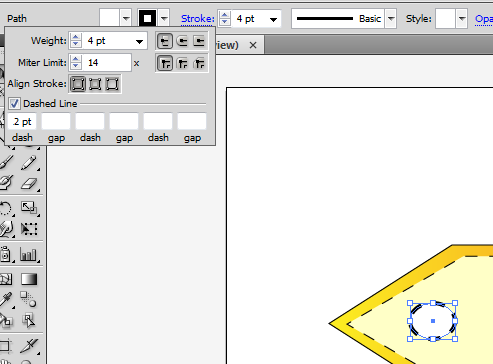
16. Let us add a shadow effect as well beneath the price tag. Duplicate the original shape that we had (CTRL+C then CTRL+V) and then change its color to a full black.
17. Send it behind by issuing the “send to back” command several times. Just right click and then select send to back or press CTRL+ [ several times. Position it so that it looks a bit like a shadow.
18. Finally, let us add our price text. Simply select the text tool and type in the price that you want.
19. It would be better of course for you to use fonts that look a bit like system or simple fonts used for price tags.
20. Great! Now you are ready to use these price tags for any of your designs!
21. Just change the colours to match your needs.
You need to be a member of Maoliworld to add comments!
Comments